CYCLE COUNT
Cycle Count is the validation process or comparison between Paper quantity and Physical quantity. Paper quantity is the system quantity whereas Physical quantity is the actual quantity that sits in your warehouse facilities.
Initiate Cycle Count
Path: Inventory> Cycle Count (Fig. 1)

( Fig. 1 )
There are four options or policies available to perform cycle count activities.
Option 1 - Location Code (You can select specific location address to perform cycle count activities.)
Option 2 – Item Code (You can select specific item code to perform cycle count activities.)
Option 3 - Random (You can specific how many items you wish. System will randomly choose for you. )
Option 4 – Item Moving Frequency - (Item moving frequency was computed by the system during your daily operation (OUT operation). It is NOT configurable. )
Example 5
At this stage, there are 15 copies of “MS Windows Vista Business” in warehouse facilities, to verify this, please click “Reports > Inventory > Inventory Details – By Item” or click “Reports > Inventory > Inventory Details – By Location”. We are about to perform cycle count to this item, hence, option 2 is selected. Here are the steps:
Step 1 Launch CYCLE COUNT operation by click “Operation > Other Operation > Cycle Count”
Step 2 Select “MS Windows Vista Business” from item code drop down and click “Search” (Fig. 2)

( Fig 2 )
As you can see “Cycle Count Details” are divided into two groups, i.e. “Original Items” & “Verify Items”.
Original Items consists of information that is recorded in the system for the past operations.
Verify Items are the fields need to be filled up during actual cycle count if there is any discrepancy from Original Items is encountered.
Step 3 Clicks “Save”. A request of performing cycle count activity is initiated now with a transaction number assigned to this request has been generated “C/Count Txn = 1” (this is a system generated number) and the “status = Active” (Fig. 3)

( Fig. 3 )
You can print it out by clicking “Print List”. Use this hard copy as reference during cycle count (Fig. 4).

( Fig. 4)
Click “Clear” to issue additional request for different item code. Otherwise, click “Close” to exit from the Cycle Count main screen.
Adjustment
Path: Inventory > Cycle Count
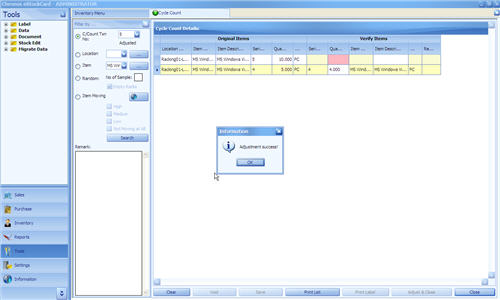
Step 1 After cycle count is performed and you have found that one copy of “MS Windows Vista Business” from the location code = Racking01-L1-C4 is lost. The actual quantity = 4 instead of 5. You must report to the system now. This process is called “Adjustment”.
Step 2 Click “Inventory > Cycle Count”.
Step 3 Select “1” from “C/Count Txn” drop down (alternatively you can select “MS Windows Vista Business from item code drop down) and click “Search”. This is to recall your previous records.
Step 4 Select the appropriate row with location code = Racking01-L1-C4. Enter the QTY = 4. All remaining fields remain blank since there is NO discrepancy. (You only need to enter what is NOT tally). Click “Adjust”.
The actual quantity has been adjusted now and the status of the request is changed from “Active” to “Adjusted” . (Fig. 5)

( Fig. 5 )
Important Note :
NO reverse process or void can be performed if the status is changed (adjusted). Inventory figures will be reflected accordingly if adjustment has been performed.
Step 5 Click “Close” to exit from Cycle Count main screen.
Validation
You can validate whether the adjustment is performed successfully by many approaches.
Option 1 Launch Reports > Inventory > Inventory Details – By Qty
Option 2 Launch Reports > Inventory > Inventory Details – By Item
Option 3 Launch Reports > Inventory > Inventory Details – By Location
Option 4 Launch Reports > Inventory > Goods Movement Details
Option 5 Launch Reports > Inventory > Cycle Count > Cycle Count Summary
Option 6 Launch Operation > Main Operation > OUT