Item Master Maintenance
Item is the essential component in order for the eStockCard inventory software to works smoothly.
Component Requirement
You need to define UOM, Group & Category before a new item can be created.
UOM ( Unit Of Measurement )
Path: Settings > Item > UOM ( Fig 1 )

(Fig 1 )
You can add, modify or deactivate UOM (but NOT delete) UOM.
Step 1 Select “Active List” from drop down.
Step 2 Add new UOM, click “New”. Enter UOM Code & UOM Description.
Step 3 Modify existing UOM, click “Modify”. You are allowed to modify UOM Description only.
Step 4 If you wish to duplicate existing record, click “Copy”. However, only UOM Description can be duplicated but must assign with new UOM Code.
Note: Old or existing records CANNOT be removed or deleted but can be deactivated. If you wish to deactivate it, just select it and click “Void”. It will be removed from the “Active List” and relocate to “Voided List”.
Group & Category
There might be thousand of items in your warehouse, therefore, you need to group and categorize them according to their nature, performance, characteristics etc. You can reap many benefits by doing so in later stage especially in analysis.
For examples, there are numerous types of hardware, software applications and accessories at computer retailers. You may group and categorize them like this:
- Hardware
- CPU ( Central Processing Unit)
- HDD ( Hard Disk Drive )
- Printer
- DRAM
- Software
- OS (Operating System)
- Office Application
- Utilities
- Accessory
- Catridge
- Storage Device
- Input Device
From the above examples, we can divide them into 3 groups and 10 categories. In general, Group can be treated as “parent” level where Category is the “child” level.
a) Group Maintenance
Path: Settings > Item > Group ( Fig 2 )

(Fig 2 )
Step 1 Select “Active List” from drop down.
Step 2 Add new Group, click “New”. Enter “Item Group Code” & “Item Group Name”.
Step 3 Modify existing Group, click “Modify”. You are allowed to modify Item Group Name only.
Step 4 If you wish to duplicate existing record, click “Copy”. However, only Item Group Name can be duplicated but must assign with new Item Group Code.
Note: Old or existing records CANNOT be removed or deleted but can be deactivated. If you wish to deactivate it, just select it and click “Void”. It will be removed from the “Active List” and relocate to “Voided List”.
b) Category Maintenance
Path: Settings > Item > Category ( Fig 3 )

( Fig 3 )
You can add, modify or deactivate Item Category (but NOT delete).
Step 1 Select “Active List” from drop down.
Step 2 Add new Category, click “New”. Enter “Item Category Code” & “Item Category Name”.
Step 3 Modify existing Category, click “Modify”. You are allowed to modify Item Category Name only.
Step 4 If you wish to duplicate existing record, click “Copy”. However, only Item Category Name can be duplicated but must assign with new Item Category Code.
Note: Old or existing records CANNOT be removed or deleted but can be deactivated. If you wish to deactivate it, just select it and click “Void”. It will be removed from the “Active List” and relocate to “Voided List”.
Create New Item
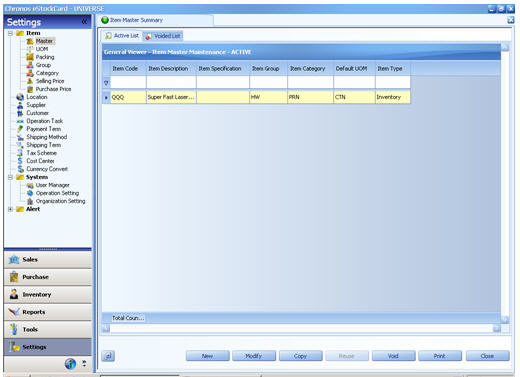
Path: Settings > Item > Master ( Fig 4 )

(Fig 4 )
You can add, modify or deactivate Item (but NOT delete).
Step 1 Select “Active List” from drop down.
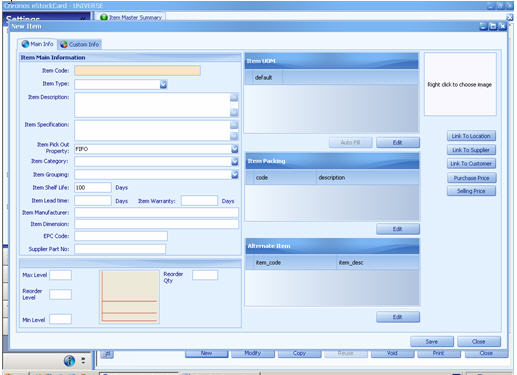
Step 2 Add new items, click “New (Fig 5 )

(Fig 5 )
Assume that a computer retailer want to add Microsoft newly-launched OS, Windows Vista Business to his item master list. Here are the steps:-
Step 1 Enter data into “Item Code”, “Item Type’ & “Item Description”.
There are free text fields except Item Type
You must be reminded that item code must NOT replicate.
For Item Type, there are 3 selection: -
- Inventory - For an inventory Item
- Services – For service job such as labour, repair and etc
- Non_Inventory – For an item which is not an inventory item
“Item Specification” is an optional field.
Step 2 Item Pick Out Property: – Select “FIFO”, “LIFO” or “No Rule”. Default value = FIFO. This will affect listing sequences during OUT operation. It is crucial.
Step 3 Select “Item Group” & “Item Category”. Do you still remember we have created new item group called “Software Applications” & new item category called “Operating Systems”?
You can select them from the drop down
Step 4 Enter numerical values into “Item Shelf Life” field. This is an important field if your item is sensitive to shelf life, for instances, food & beverages, chemical substances etc.
Step 5 There are some optional field such as Item lead Time, Warranty, Item Dimension, Item Manufacturer, EPC Code and Supplier Part No.
Step 6 Enter numerical values in “Max Level”, “Reorder Level”, and “Min Level & Reorder Qty” fields if you wish to monitor its inventory level. If data are entered, the system will monitor the inventory status and you will be alerted automatically. Please refer to Alert function.
Step 7 Assign proper UOM. You can see a sub-menu called “Item UOM”. Click “Edit” and select proper UOM Code. System has some default values (most common use), if you can’t find an appropriate one, you must pre-define first Settings > Master > UOM.
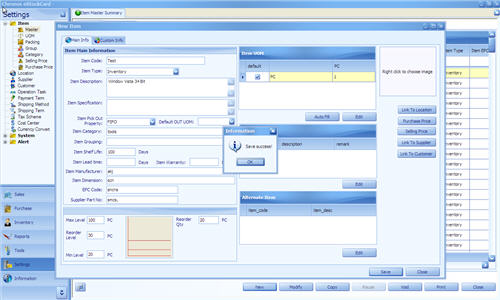
Step 8 Click “Save”. To exit from this screen, clicks the Close button. You will see this. ( Fig 8 )

( Fig 8 )
New item has been created successfully!! You can proceed with any operation now.
If you wish to modify or amend existing records, you are allowed to do so. Settings > Item > Master, Click “Modify”. You are allowed to modify any record except item code.
If you wish to duplicate existing records, you are allowed to do so. Settings > Item > Master, Click “Copy”. All the fields will be duplicated except item code.
If you wish to deactivate particular record, you are allowed to do so. Settings > Item > Master, Click “Void”. It will be removed from the “Active List” and relocate to “Voided List”.
Note : Old or existing records CANNOT be removed or deleted but can be deactivated (become NOT active)