ALERT
Alert module provides further value to inventory control processes in the form of Management by Abnormality. It provides 5 types of alert events:
- Inventory max level
- Inventory min level
- Inventory re-order level
- Items remaining shelf-life (About-to-expire)
- Expired item & quantity
Users can set up methods of notification (IM or Email), scheduled checking and it will automatically alert targeted recipients if criteria is met.
Component Requirement
Prior to the launching of Alert function, please make sure the following services must be installed and configured:
a) Activate “Chronos eStockCard3 Alert Service”
Alert scanning engine can only run on the server where your database is located.
During the installation of e-StockCard (Server), “Chronos eStockCard3 Alert Service” will be installed automatically; user does not require configuring manually. Anyway, If you wish to verify whether “Chronos eStockCard3 Alert Service” is activated or not, here are the steps:
Step 1 Launch Start > Control Panel > Administrative Tools > Services (Fig. 1)
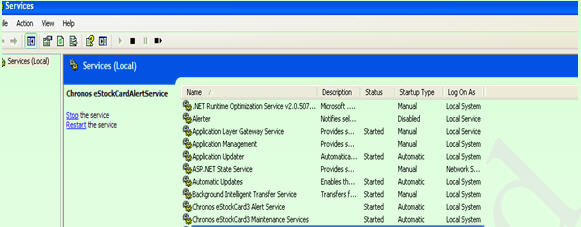
( Fig 1)
Step 2 Choose the row where name = “Chronos eStockCard3 Alert Service”. Make sure Status = Started.
b) System Setting
You must configure alert scanning engine if you wish to reap benefits from Alert module. Additionally, you may have to seek advice from your IT administrator since this will involve configuring your organization’s e-mail server.
Path: Settings > Alert > System Setting
Step 1 Click “Settings > Alert > System Setting. (Fig. 2)
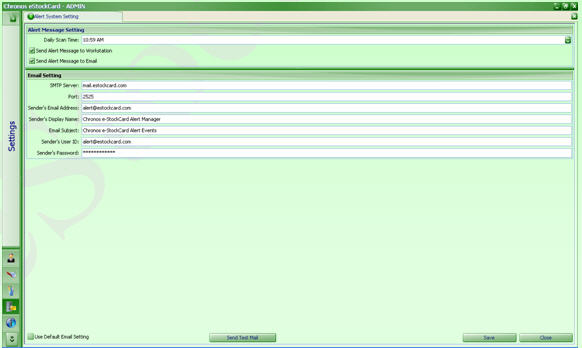
( Fig 2 )
There main screen consists of two parts which must be configured properly.
i) Alert Message Setting
- Daily Scan Time – System will scan events once a day only. You can choose any time you want to wake up your scanning engine. Current setting = 12.40 pm
- Send Alert Message to “Workstation” - If you tick this option, the alert message will be sent to your current workstation (you must install e-StockCard Client). You can view alert event by launching Operation > Other Operation > Alert Event. Current setting = Enable
- Send Alert Message to “Email” - If you tick this option, the alert message will be sent to the targeted recipients where you have to specify their email addresses. Current setting = Enable
ii) Email Setting.
In this section, you have to specify which email broadcaster that you wish to use. e-StockCard scanning engine will send alert messages to email broadcaster and the later will broadcast to targeted recipients. In summary, e-StockCard scanning engine will NOT broadcast directly.
You may have to consult your IT administrator to configure this part properly. The current setting and configuration belongs to Chronos Consulting Center.
For info: – once all the info have been set, the users can click on Send Test Mail to check whether the email alert can be send or not. If the email can be received, then the setting is done correctly otherwise please re-check back on the settings.
Event Setting
Path: Settings > Alert > Event Setting
In this section, you will learn to how configure an event so that it can be processed and monitor by scanning engine. Once it is configured, system will scan and monitor it daily and report the abnormality, if any.
Step 1 Click “Settings > Alert > Event Setting (Fig. 3)
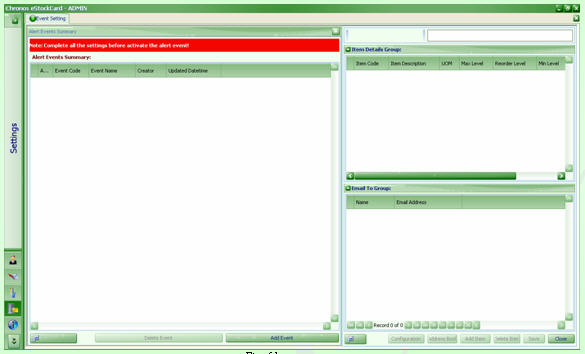
(Fig 3)
Step 2 Click “Add Event” (Fig. 4)
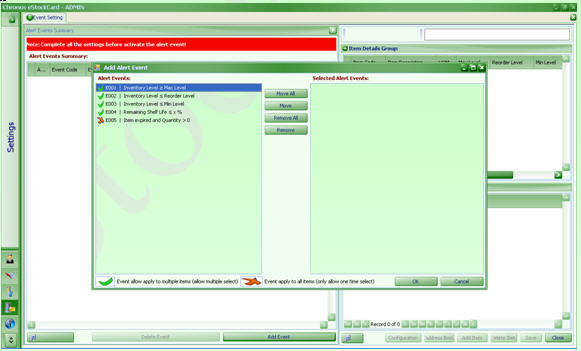
( Fig 4 )
Three are 5 types of different events available. (Event code which is NOT amendable)
IMPORTANT NOTES
The events can be classified into 2 categories:
i) Configurable events
- Marked with “ √ ”
- Event Codes : E001, E002, E003 , E004 & E005
- E001, E002 & E003. Parameter : Item Code
- Remaining shelf-life , but express in %
ii) Non- Configurable event
- Marked with “ X ”
- Event Code : E005
- As long as the item has expired, it will be displayed
Example:
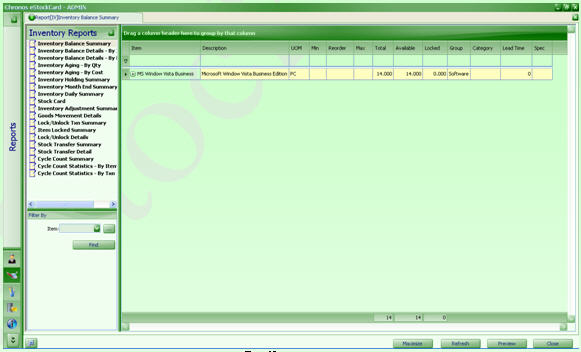
Item code “MS Windows Vista Business” has 14 copies in warehouse which is exceeded maximum level. (Max level can be set at Settings > Item > Master). You can verify this by launching Reports > Inventory > Inventory Summary – By Qty (Fig. 5) .
( Fig. 5 )
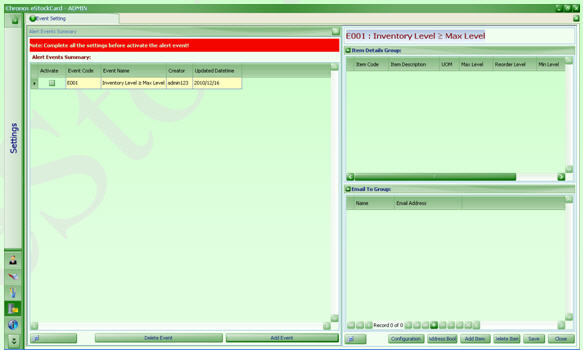
Step 3 Click “OK”, you will see an event is added to the “Alert Events Summary”. (Fig. 6)
( Fig 6)
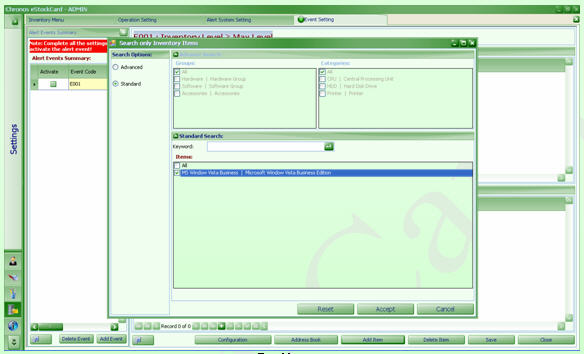
Step 4 You must assign this event E001 to any specific item that you want to monitor. Select the row with “Event Code = 001” and click “Add Item”, you will see a new pop up. You can use default options, which is “Standard” search options. Type “MS” at Keyword field (Fig. 7)
( Fig 7 )
Step 5 Select “MS Windows Vista Business” from items drop down and click “Accept” You have successfully assigned item code = “MS Windows Vista Business” to event E001.
Step 6 If you wish to receive any alert message through email, click “Configuration” and tick “Send Alert Message to Email”.
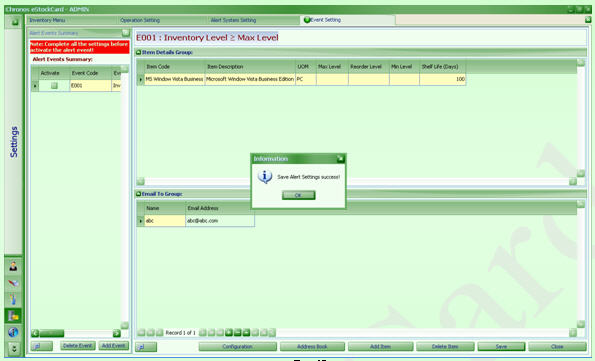
Step 7 Specify email addresses who are the recipients of alert messages. Add, Edit or delete email address will be performed under “Email To Group” sub-screen.
Click “ + ” to add email address, Click “ √ ” to save the email address.
Step 8 Activate “Alert Scanning Engine” to scan the event you just have created. Tick “Activate” from the “Alert Events Summary” sub-screen and click “Save”, You have completed event setting. (Fig. 8 )
( Fig 8 )
Event Listing
a) Workstation Mode
Path: Inventory > Alert Event (Fig. 9 )
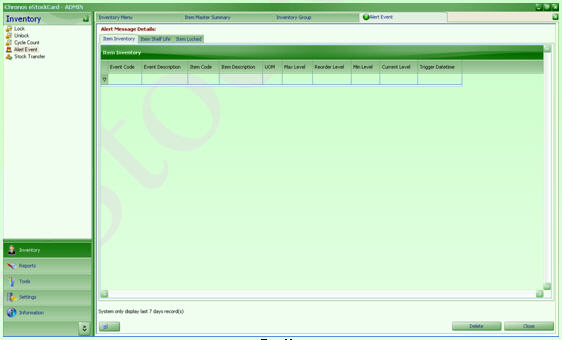
(Fig 9 )
Alert message was fired by Alert Scanning Engine and alert you that the current inventory holding for MS Windows Vista Business is exceeded max level. You must take proper action to stop to pile up your inventory.
b) Email Mode
Similar alert message will be directed and sent to the target recipients (Fig. 10)
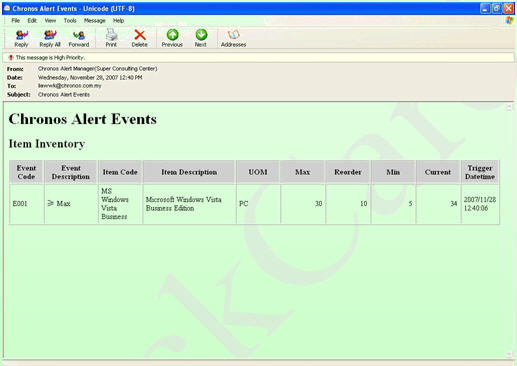
( Fig 10 )
Related posts:
- Alerts Events available in the eStockCard Inventory System
- Why I were unable to receive email alert in the eStockCard Tracking System?
- Currently I’m using eStockCard Standard (v2.1.7) and I want to upgrade to eStockCard Premier (v3.1). How do I proceed?
- Private: After purchasing the Chronos eStockCard Inventory Software via electronic payment gateway, what should I do next?